Install Bodhi App
Bodhi App is available for multiple platforms including desktop apps (Windows, macOS, Linux) and Docker containers. Choose the installation method that best suits your environment.
System Requirements
- Memory: 16GB RAM recommended for local model inference; 2GB RAM minimum for API-only workflows
- Storage: <50MB for app installation, variable storage for models (500MB to 20GB+ per model depending on size and quantization)
- Processor: Apple Silicon (M1/M2/M3) or Intel processor for macOS; AMD64/ARM64 for other platforms
- Operating System: macOS 14.0+, Windows 10+, Linux (Ubuntu, Debian, Fedora, and derivatives)
Installation Steps
Choose your platform for installation instructions:
macOS Installation
macOS Apple Silicon (M1/M2/M3):
- Download the macOS
.dmgfile for Apple Silicon from our releases page. - Open the disk image and drag Bodhi App into your Applications folder.
- Launch Bodhi App from the Applications folder.
Windows Installation
- Download the Windows installer (
.msi) from our releases page. - Run the installer and follow the installation wizard.
- Launch Bodhi App from the Start menu or desktop shortcut.
Linux Installation
- Download the appropriate package for your distribution from our releases page.
- Install using your package manager (e.g.,
dpkg -ifor Debian/Ubuntu,rpm -ifor Fedora). - Launch Bodhi App from your applications menu.
Docker Installation
For server deployments and cloud platforms, see Docker Deployment Guide for complete instructions including:
- CPU variant (AMD64 + ARM64)
- CUDA variant (NVIDIA GPU acceleration)
- ROCm, Vulkan, MUSA, Intel, CANN GPU variants
Post-Installation: Setup & Launch Flow
After installing and launching Bodhi App, you'll go through a guided 6-step setup wizard to configure your instance.
Launching Bodhi App
When you launch Bodhi App, the app icon appears in your system tray (desktop) or runs as a service (Docker), and a browser window automatically opens on localhost:1135.
Setup Wizard Overview
The wizard includes:
- Welcome - Configure server name and description
- Resource Admin - First user becomes admin (first user only)
- Download Models - Select chat and embedding models
- API Models - Configure remote AI providers (optional)
- Browser Extension - Install browser extension (optional)
- Complete - Finish setup and start using Bodhi App
Duration: Typical setup takes less than 5 minutes (excluding model downloads which continue in the background).
Navigation: You can navigate backward/forward through the first two mandatory steps (Welcome and Resource Admin). After reaching the Download Models step, you can exit the wizard and continue later by visiting /ui/setup/download-models/.
Step 1: Welcome
Configure basic information about your Bodhi App instance.
Fields:
- Server Name: Identifier for your Bodhi App instance (minimum 10 characters)
- Description: Optional details about this instance
Benefits Display: The welcome screen highlights Bodhi App's key features:
- Complete Privacy - Data stays on your device
- Cost Freedom - No per-token charges
- Hybrid Flexibility - Mix local and remote AI (marked "NEW")
- Multi-User Ready - Secure authentication (marked "NEW")
- Browser AI Revolution - Browser extension integration (marked "NEW")
- Open Ecosystem - Open source and extensible
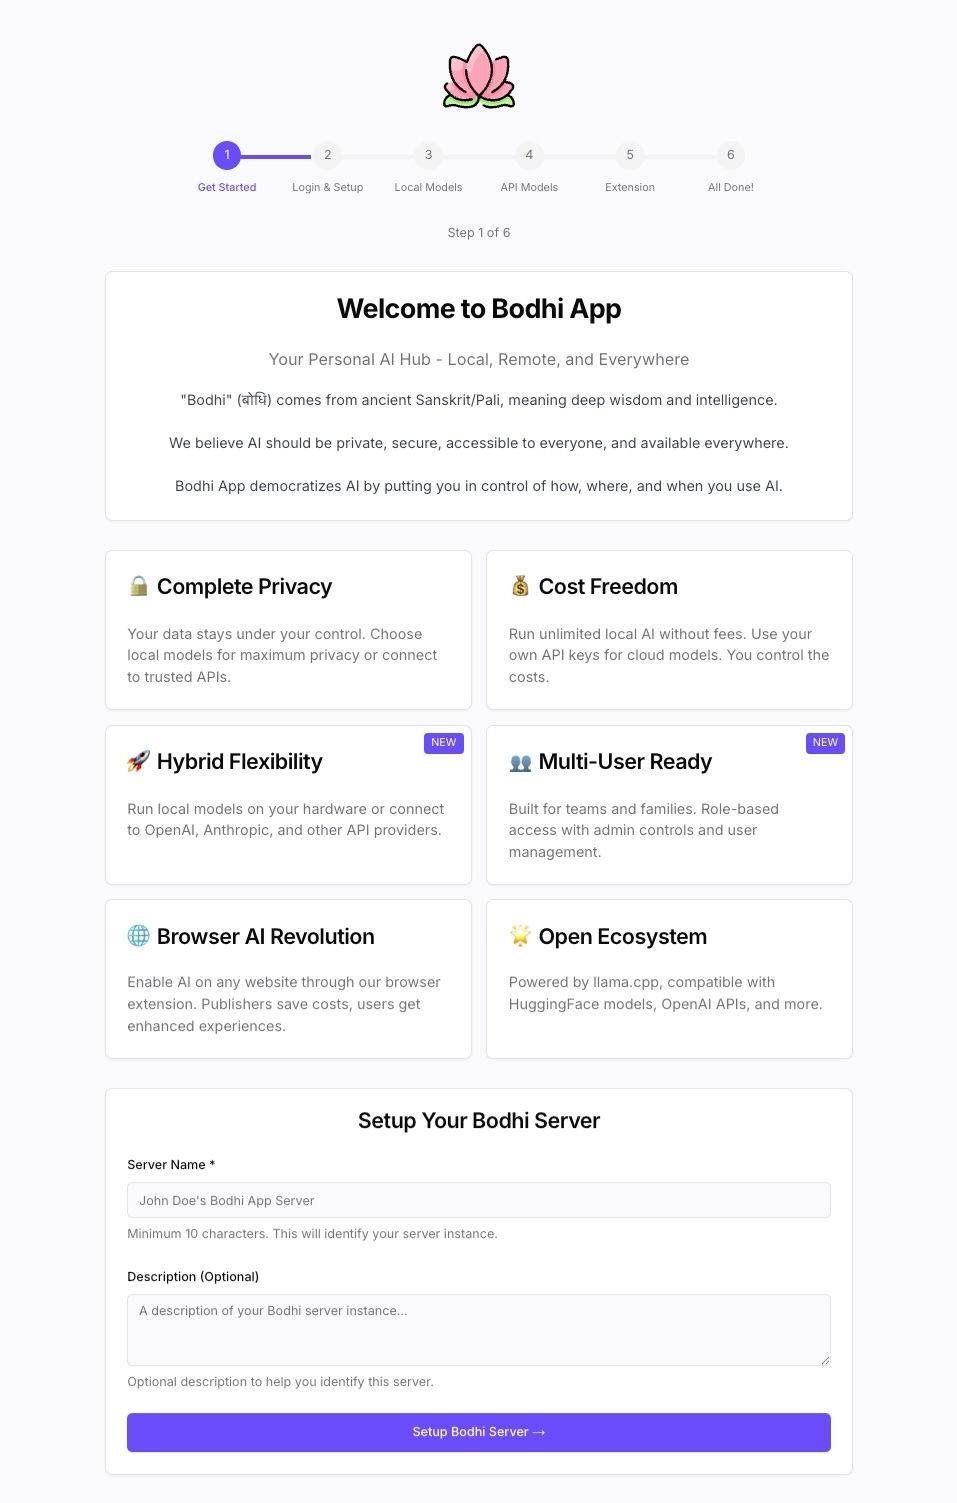
Steps:
- Enter server name (required, minimum 10 characters)
- Enter description (optional)
- Click "Continue"
Validation: Server name must be at least 10 characters. No other restrictions apply.
Next Step: First user → Resource Admin setup; Other users → Download Models
Step 2: Resource Admin Setup (First User Only)
If you're the first user, you'll automatically become the admin. This step requires OAuth2 authentication.
Who Sees This Step:
- First user to access Bodhi App (determined by checking if any users exist in the database during OAuth login)
What Happens:
- You log in via OAuth2
- Automatically assigned admin role
- Granted full system access
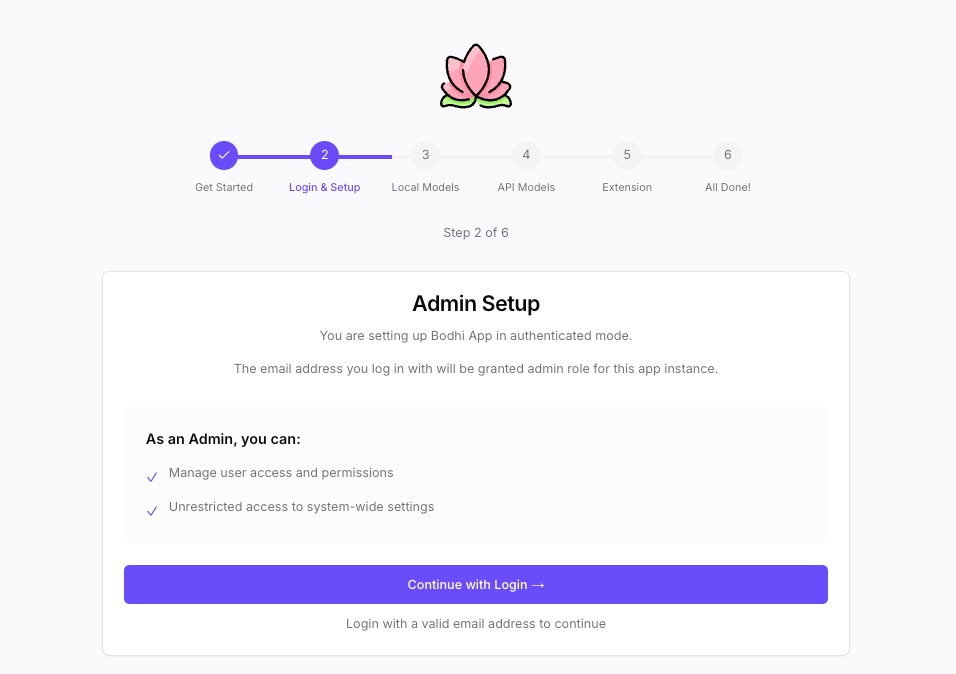
Steps:
- Review admin capabilities explanation:
- Manage user access and permissions
- Unrestricted system-wide settings access
- Click "Continue with Login"
- Redirected to OAuth provider
- Authenticate with credentials
- Return to Bodhi App
- Proceed to Download Models step
Admin Capabilities:
- Approve user access requests
- Manage user roles
- Configure system settings
- Full application access
Step 3: Download Models
Select and download GGUF models for local inference. Models are categorized by performance tier.
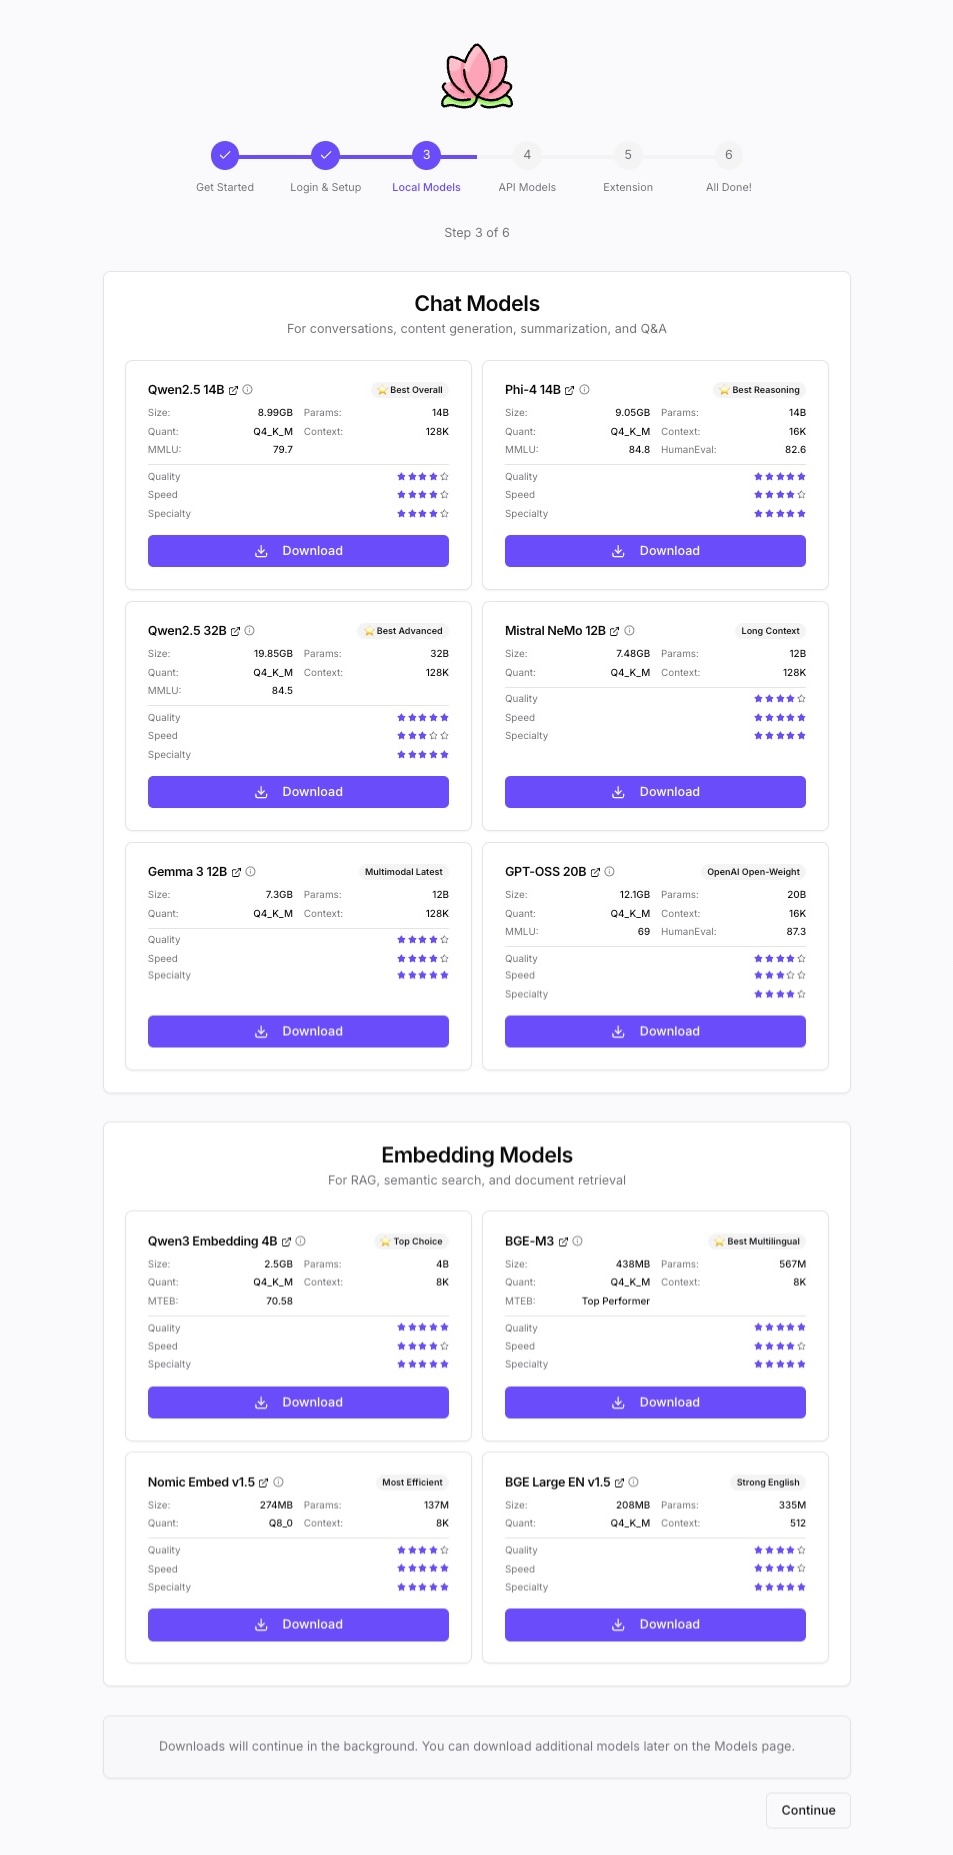
Model Categories:
Models are selected and categorized based on their size and capabilities using open-source performance benchmarks.
Fast Models (Quick inference, lower capability):
- Lightweight models optimized for speed
- Use case: Quick drafts, simple Q&A, rapid prototyping
Balanced Models (Quality/speed tradeoff):
- Mid-size models balancing performance and capability
- Use case: General purpose chat, content generation
Powerful Models (Maximum capability, slower):
- Larger models with advanced reasoning capabilities
- Use case: Complex reasoning, coding, advanced tasks
Embedding Models (For RAG and semantic search):
- Specialized models for text embeddings
- Use case: Semantic search, retrieval-augmented generation (RAG)
Model Cards Display: Each model card shows:
- Model name
- File size
- Tier badge (Fast/Balanced/Powerful)
- Benchmark scores (open-source performance benchmarks - search online for detailed score interpretations):
- MMLU: Massive Multitask Language Understanding
- BBH: BIG-Bench Hard
- HumanEval: Code generation evaluation
- Download button
- Download status indicator (shows when download is in progress or complete)
Steps:
- Browse model catalog
- Click "Download" on desired models
- Progress bar shows:
- Percentage complete
- Bytes downloaded / Total bytes
- Download speed (as provided by HuggingFace library)
- Time remaining estimate (as provided by HuggingFace library)
- Downloads continue in background
- Click "Continue" to proceed (downloads don't stop)
Background Downloads:
- Models download while you continue setup
- Can leave wizard and downloads continue
- View download status on the Model Downloads page (/ui/pull/)
- Downloads use the optimized HuggingFace library for maximum performance
Storage:
- GGUF model files are stored in your local HuggingFace home folder (shared with other HuggingFace tools)
- Model alias configurations are stored separately in
$BODHI_HOME/aliasesas YAML files - Storage location follows HuggingFace conventions and cannot be changed during setup
Step 4: API Models (Optional)
Configure remote AI API providers to use cloud models alongside local ones.
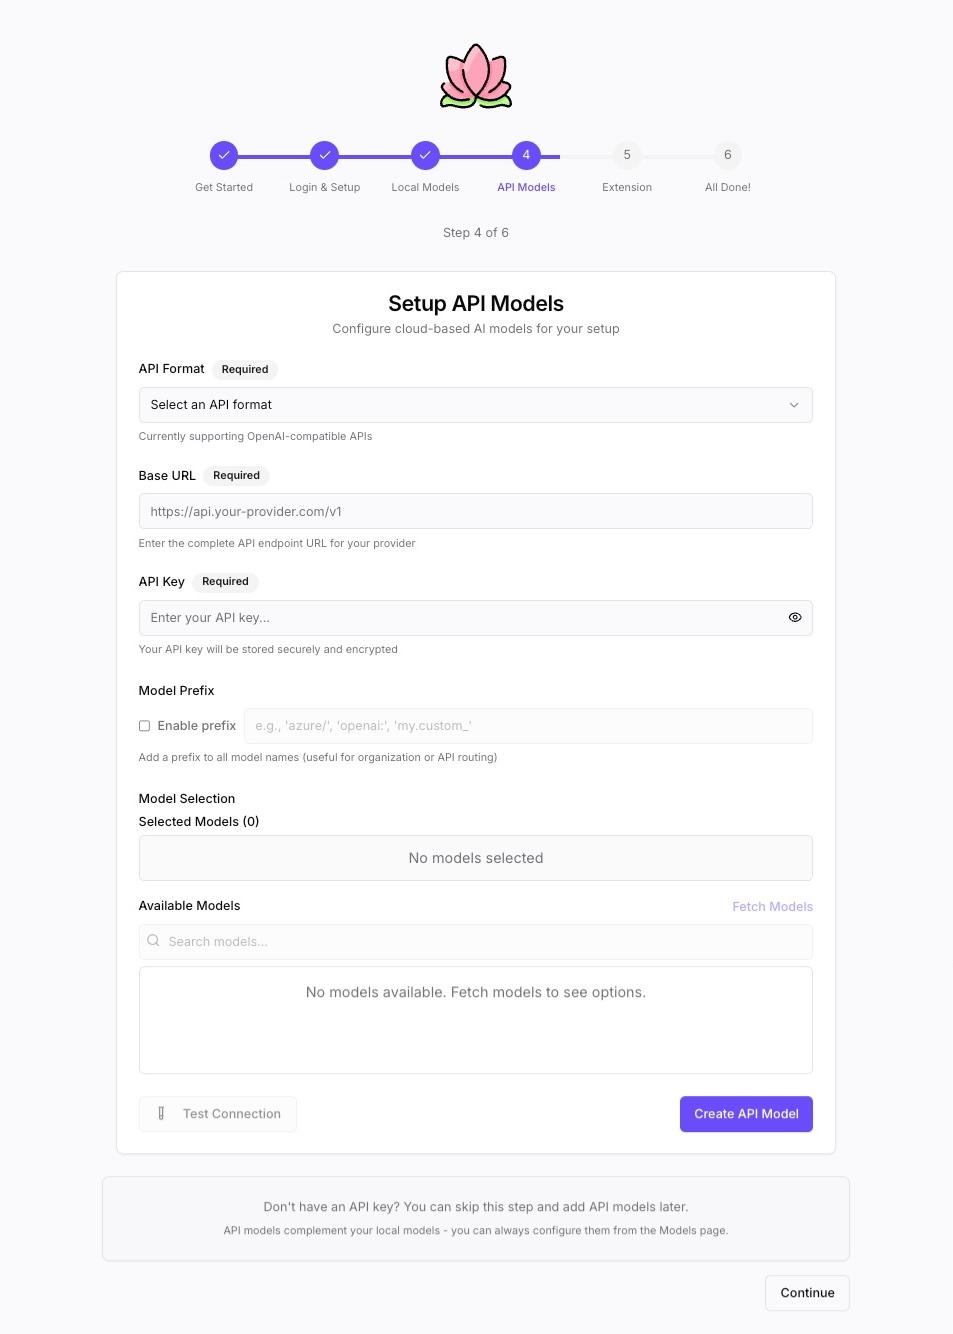
This Step is Optional: Click "Skip" to bypass API model configuration
Why Configure API Models?
- Access latest frontier models (GPT-4, Claude 3.5, etc.)
- No local GPU required
- Complement local models with cloud capabilities
Steps:
- Select provider template (OpenAI, Anthropic, Groq, Together AI, Custom)
- Enter API key
- Configure base URL (auto-filled for known providers)
- Optional: Enable and set prefix
- Click "Fetch Models" to discover available models
- Select models from list
- Test connection (recommended)
- Save or Skip
Skip Option:
- Message: "Don't have an API key? You can skip this step and configure API models later"
- Configure later via the API Models page (/ui/models/)
Detailed Configuration: See API Models Guide
Step 5: Browser Extension (Optional)
Install the Bodhi App browser extension to use AI on any website.
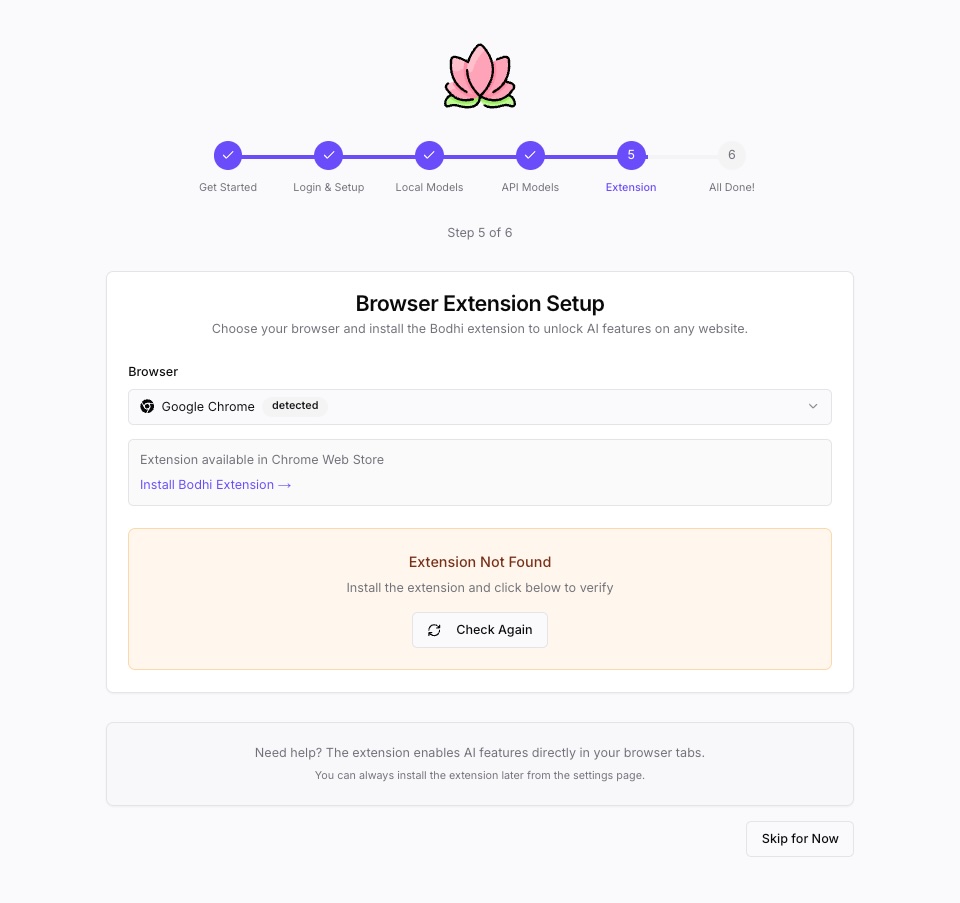
Auto-Detection:
- Wizard detects your current browser
- Currently supports Chrome
- Can manually select different browser
Extension Features:
- Exposes authenticated Bodhi App endpoints to any webpage
- Enables AI capabilities powered by Bodhi App on any website
- Powerful integration for web-based AI workflows
- Recommended for maximum Bodhi App functionality
Steps:
- View detected browser
- Or select browser manually from dropdown
- Check installation status
- If not installed:
- Click "Install Extension" button
- Redirected to Chrome Web Store (for Chrome users)
- Install from store
- Return to wizard
- Click "Refresh Status" to verify installation
- If installed:
- Status shows "Extension Installed"
- Click "Continue"
- Or click "Skip" to bypass
This Step is Optional: Extension enhances Bodhi App but is not required
Step 6: Complete
Setup complete! Time to start using Bodhi App.
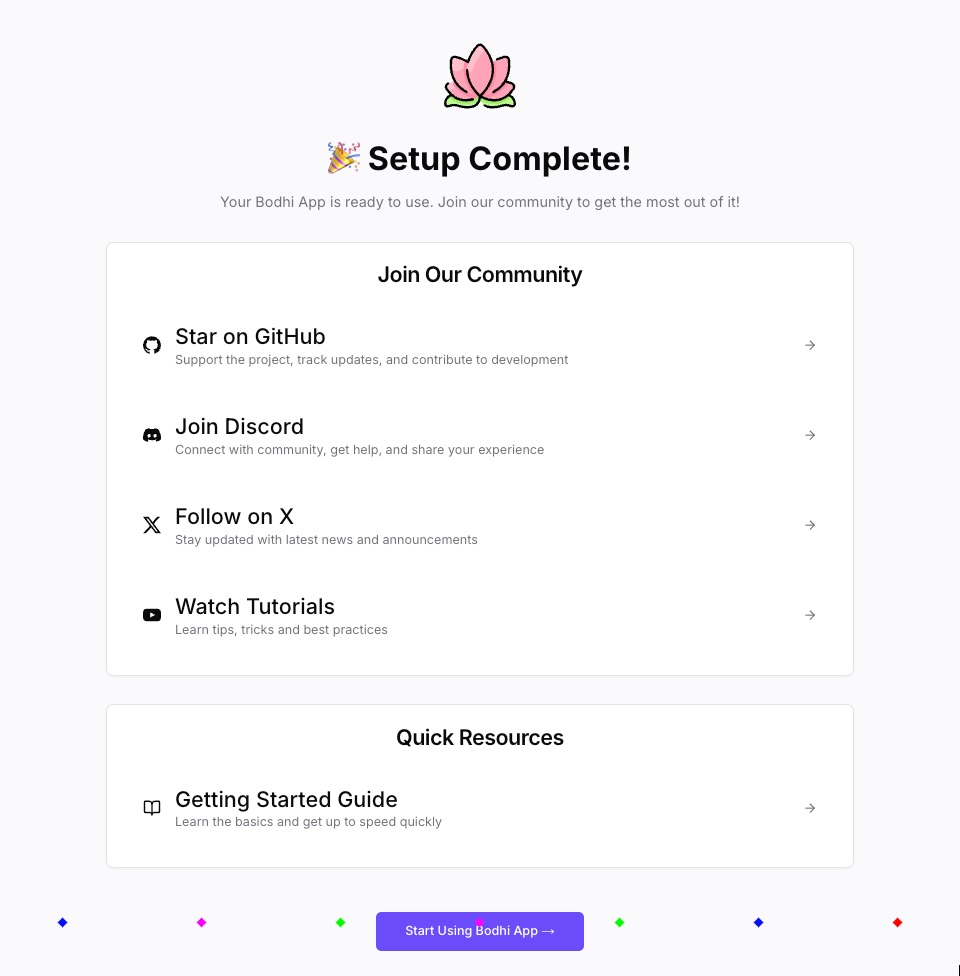
Completion Screen:
- Confetti animation celebrates completion
- Message: "Setup Complete!"
- Community engagement options
- Quick resources
- "Start Using Bodhi App" button
Community Links:
- Star on GitHub: https://github.com/BodhiSearch/BodhiApp
- Join Discord: Community channels for support
- Follow on X: Updates and announcements
- Watch Tutorials: Video guides and walkthroughs
Quick Resources:
- Getting Started Guide and feature documentation
- API references and developer resources
Steps:
- Review community links (optional)
- Click "Start Using Bodhi App"
- Redirected to the Chat page to begin using Bodhi App
- Setup wizard complete!
Resuming Setup
Mandatory Steps (Welcome & Resource Admin):
- Must be completed before proceeding
- Cannot exit until these are finished
Optional Steps (Download Models onwards):
- Can exit wizard at any time after Resource Admin step
- Taken directly to Chat page on next login
- Resume by visiting /ui/setup/download-models/ in your browser
- Can navigate through remaining wizard steps from there
Progress Tracking:
- First two steps must be completed in sequence
- After Download Models step, setup is considered complete
- No setup wizard shown again unless manually accessed
Accessing Setup Wizard Later
URL Access:
- Visit /ui/setup/download-models/ to access the Download Models step
- Navigate through remaining optional steps (API Models, Browser Extension, Complete)
When Setup is Required:
- Server name and description (Step 1) completed during first launch
- First user admin assignment (Step 2) completed during first OAuth login
- Other steps can be completed anytime after initial setup
Troubleshooting
Setup Wizard Not Appearing
Symptoms: App goes directly to login or main page instead of setup.
Possible Causes:
- Setup already completed
- Configuration already exists
- Browser session state
Solutions:
- Check if setup was previously completed
- Try clearing browser cache and cookies
- Contact administrator if access request needed
Cannot Continue from Welcome Step
Symptoms: "Continue" button disabled or validation errors.
Possible Causes:
- Server name less than 10 characters
- Network connectivity issue
Solutions:
- Ensure server name meets minimum length (10 characters)
- Check for validation error messages below fields
- Verify network connection
Model Downloads Failing
Symptoms: Download starts but fails with error.
Possible Causes:
- Network connectivity issues
- Insufficient disk space
- HuggingFace API rate limiting
Solutions:
- Check available disk space
- Verify network stability
- Retry download from /ui/pull/ page
- Check error details in download history
- See Model Downloads Guide for detailed troubleshooting
API Model Configuration Errors
Symptoms: Cannot save API model configuration or connection test fails.
Possible Causes:
- Invalid API key
- Incorrect base URL
- Network connectivity issues
Solutions:
- Verify API key copied correctly (no extra spaces)
- Check base URL for typos
- Test provider API directly (e.g., using curl)
- Skip step and configure later from Models page
- See API Models Guide for detailed troubleshooting
Browser Extension Not Installing
Symptoms: Extension installation fails or status not detected.
Possible Causes:
- Browser not supported (currently only Chrome supported)
- Extension not available in store
- Browser permissions required
Solutions:
- Verify browser is supported (Chrome)
- Try manual installation from Chrome Web Store
- Check browser extension permissions
- Skip step and install later manually
- See Browser Extension section (Step 5) above for installation details
You may now begin using Bodhi App.